Guides / Maximum point blank range and your real group size
Maximum point blank range and your real group size
The MPBR number on a calculator assumes every bullet goes exactly where the last one did. Your rifle doesn't do that and neither do you. Here is what happens to point blank range when real-world group size is added, and what it means when a buck steps out at a distance you haven't ranged.
The number we all want to trust
Most of us learn maximum point blank range the same way. Someone at the range, or a box of ammunition, or a calculator tells you: zero here, hold dead on the shoulder, and you're good out to 350 yards. No ranging, no dialling, no hold-over. It's a comforting idea, especially on that first hunt, when your heart is going and the animal won't stand there forever.
The idea is sound. But the headline figure quietly assumes something no rifle and no hunter can deliver: that every bullet lands exactly on the average path. Add in the way shots actually scatter and the honest answer is often much shorter than you'd expect. It isn't a reason to give up on point blank range. It is a reason to understand it properly, so the shot you take is one you can stand behind.
A few words you'll see, in plain English
Trajectory — the curved path the bullet takes. Your barrel points slightly up at the target, so the bullet rises above your line of sight, reaches a peak, then falls back through it.
Line of sight — the straight line from your eye through the scope to the target. On the chart it's the flat line at 0.
Vital zone — the area you need to hit for a clean, ethical kill, treated as a circle of a given diameter. 8 inches is the usual figure for deer-sized game; 4 inches suits smaller animals or a tighter standard.
Near zero and far zero — the two places the bullet crosses your line of sight. It crosses once going up, close to the muzzle, and once coming down, further out. The far zero is the distance you actually sight your rifle in for.
Max rise — the highest point of the trajectory above your line of sight, usually somewhere in the middle distances.
MPBR (maximum point blank range) — the furthest distance you can hold dead centre and still land inside the vital zone, with the bullet's rise and fall never leaving it.
MOA (minute of angle) — a way of measuring group size that grows with distance. In this calculator 1 MOA means 1 inch at 100 yards, 2 inches at 200, 3 inches at 300. (Strictly it is about 1.047 in per 100 yd; we round to 1 inch because that's how shooters talk about groups.)
Dispersion — the spread of your shots around the point you aimed at. It comes from the rifle, the ammunition, the wind, your position, your breathing and your nerves.
Practical MPBR — the distance to which your whole group, not just the average shot, stays inside the vital zone.
The example load
Every chart below comes from the point blank range calculator on this site, with one load kept constant so only the precision changes: a 6mm Creedmoor with a 90 gr bullet, G7 BC 0.26, 3150 fps, and a scope 1.8 in above the bore. You can open this exact load and follow along.
0 MOA: the textbook maximum point blank range
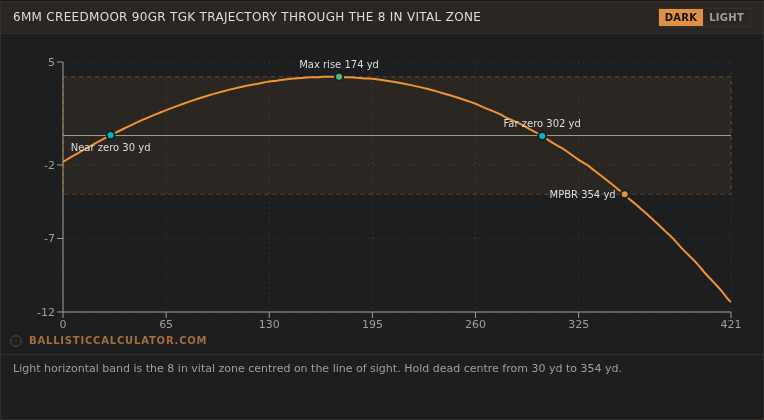
This is the number most people quote. With precision set to 0 the calculator treats you as a machine: every bullet lands on the orange line. The zero is chosen so the line just kisses the top of the 8 in band at about 174 yards and falls out the bottom at 354 yards. Zero at 302 yards, or about 3 in high at 100, and in theory you can hold on the middle of the chest anywhere from 30 to 354 yards.
Look closely at the peak though. The path doesn't just come near the top of the vital zone, it touches it. That detail is the whole story of this guide.
Adding your group: what the coloured band means
When you enter a precision above zero, the chart draws two dashed lines around the trajectory: the top and bottom of your group at each distance. The band between them is where your shots can realistically land. It gets wider the further out you go, because MOA grows with distance.
The band is coloured to show how it lines up with the vital zone. Blue means the whole group fits inside it. Red means part of the group is poking out the top or the bottom. It is a picture of the full group height, not a percentage chance of a hit. Even in the red, most shots may still land in the vitals. Red means you can no longer count on all of them.
1 MOA: a very good rifle from a very good rest
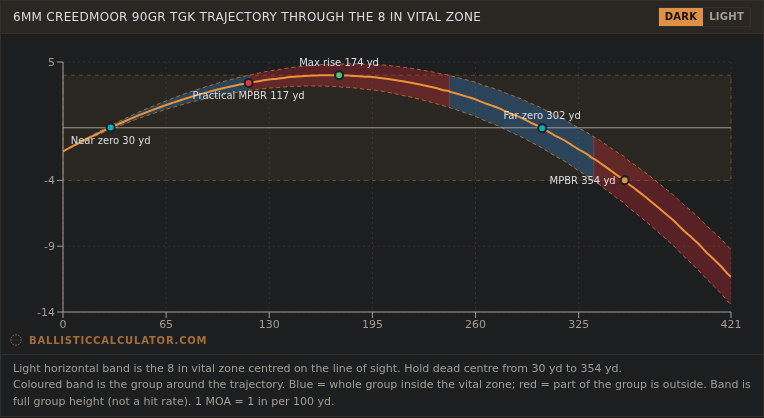
One MOA is what a good hunting rifle does off sandbags on a calm day. Even here, the practical MPBR drops to 117 yards. That surprises nearly everyone the first time. Your rifle hasn't got worse. The trajectory hasn't changed. What changed is that the calculator now remembers the top half of your group.
Why true MPBR stops where the top of the group starts missing
Here's the part that isn't obvious. An MPBR zero puts the centre of the trajectory right on the top edge of the vital zone at its highest point. So around that peak, half of any real group is already sitting above the zone. As soon as the group has any height at all, the first bullets to leave the vitals are the high ones, in the middle distances, not the low ones at long range.
That's why practical MPBR ends much earlier than the textbook figure: it is measured to the first point where the whole group stops fitting. On these charts it is where the band first turns red on its way up to the peak. Further out the path falls and the group may drop back inside for a while, which is the blue patch you see near the far zero on some charts. But you'd have to know you were in that patch, and without a rangefinder you don't. So the calculator stops counting at the first miss.
It's worth saying clearly: the calculator does not re-zero the rifle for your group. It keeps the standard MPBR zero and shows you honestly what your group does on that path. If the red bothers you, that's useful information, and the fix is in the next few sections.
2 MOA: prone, or off a solid bipod
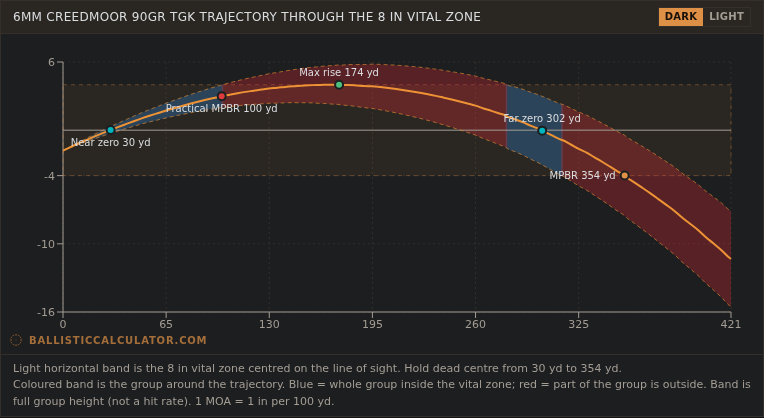
Two MOA is a realistic field number for a steady prone shooter with a bipod or a pack. The practical window shrinks to 100 yards. You can see the pattern clearly now: red above the zone through the middle distances, a short blue stretch where the falling path brings the group back in near the far zero, then red again as the group widens and drops out the bottom.
3 MOA: seated or kneeling with sticks
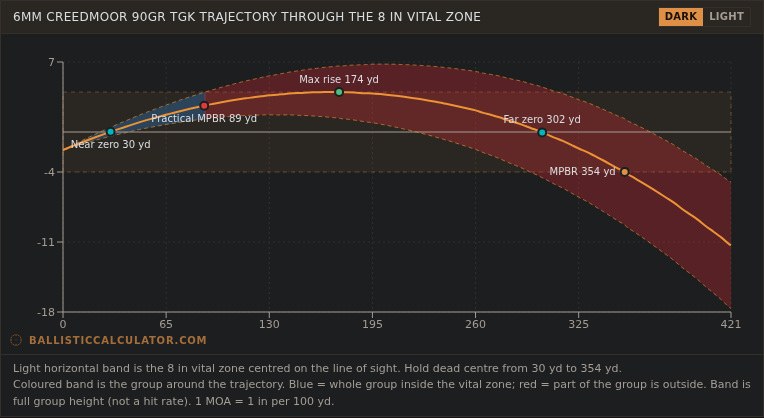
Three MOA is about what most of us manage sitting or kneeling off shooting sticks, with a bit of adrenaline in the mix. At 300 yards that's a group roughly 9 inches tall, already wider than the 8 in vital zone. The practical window is 89 yards.
5 MOA: offhand or rushed
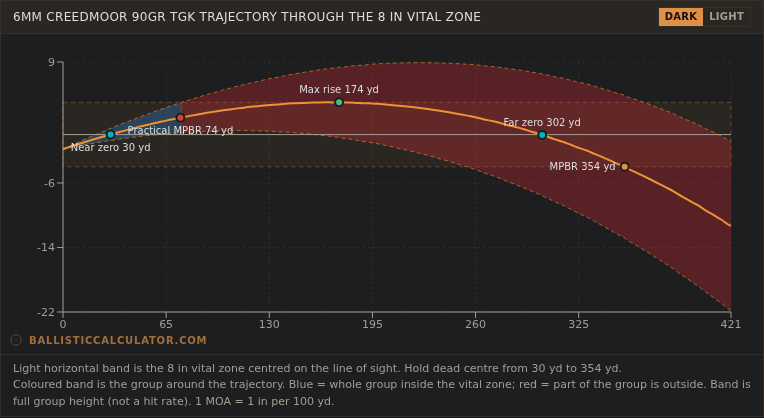
Five MOA is a fair guess for a quick standing shot, or a shot off a tree branch when you're breathing hard from the climb. The band is now so tall that almost nothing beyond 74 yards keeps the whole group in the vitals.
7 MOA: freehand under pressure
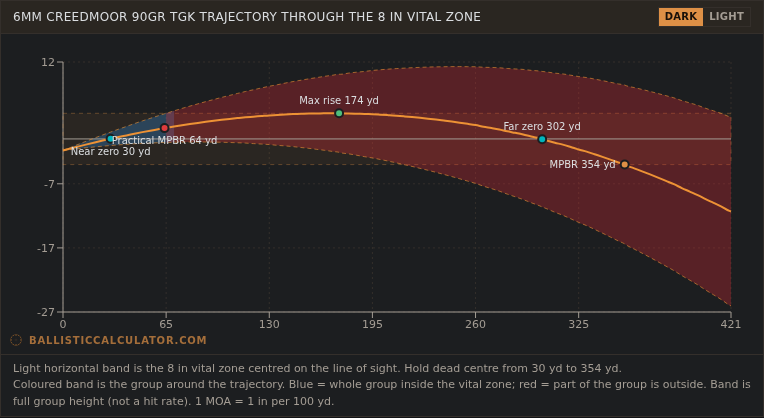
Seven MOA is honest offhand shooting for many hunters. At 300 yards it's a 21 in tall group. The chart goes red almost from the start. This isn't meant to scare you off. It's meant to show why experienced hunters say the most important piece of kit is a steady rest, not a flatter cartridge.
A smaller vital zone makes it worse
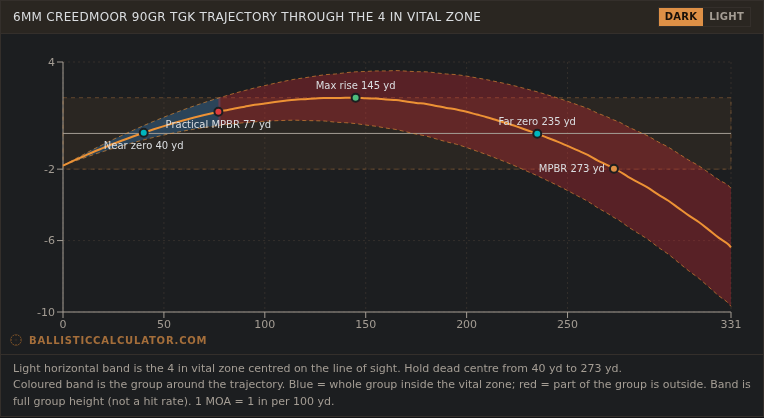
Halve the vital zone to 4 in, for smaller game or a stricter standard, and the textbook MPBR falls to 273 yards. With a 2 MOA group the practical figure is 77 yards. Small targets and point blank range don't mix well. For those, range the animal and dial.
Finding your best zero
The textbook MPBR zero is built for a perfect rifle. It pushes the centre of the path right up to the top edge of the vital zone, so the moment you add a real group, the top of that group clips out in the middle distances — the very distances where most game is shot.
Bring the zero in a little and the arc flattens out under the top of the zone. You give up a few yards of the textbook number, but the whole group stays inside for much longer. With the .308 168 gr preset, an 8 in zone and a 3 MOA seated group, moving the zero from about 250 yd back to 196 yd stretches the practical MPBR from 76 yd to 210 yd.
On the point blank range calculator, drag the Far zero dot on the chart, use the Your zero slider, or type a maximum height above the sight line. Or set your Precision and press Best zero for my group: it tries every far zero and picks the one that keeps your whole group inside the vital zone furthest out. Then sight in to the "Impact at 100 yd" figure it shows.
What this means in the field
- Know your real group, not your best group. Shoot three or four shots from the position you'll actually hunt from, at 100 yards, and measure top to bottom. That height in inches is your MOA. Put that number in, not your bench group.
- The first misses are usually high. With an MPBR zero, a mid-range miss tends to go over the back, not under the chest. Hold a touch lower in the middle distances if you must hold at all.
- Consider a gentler zero. Many hunters sight in a little lower than the pure MPBR zero, often 2 to 2.5 in high at 100 yards instead of 3, which gives the group some headroom under the top of the vitals. You give up a bit of reach at the far end in exchange for fewer high misses in the middle.
- Steadier beats flatter. Going from 5 MOA to 2 MOA adds more practical range than switching to a faster cartridge. Practise from sticks, a pack and prone.
- Carry a rangefinder when you can. Point blank range is for the moment you have no time. When you do have time, range it and use a DOPE card.
- Wind is extra. These charts only cover up and down. A crosswind pushes the group sideways as well, so the real window is smaller again. Check drift on the trajectory calculator.
How to use the precision inputs on the calculator
- Enter your load on the point blank range calculator, or pick a preset, and give it a name so it shows in the chart title.
- Set the vital zone for the animal you're after.
- In Precision (MOA), type your field group or use a quick button: 0 none, 2 prone, 3 seated, 5 offhand-ish. Leave it at 0 to see the classic figure.
- Read Practical MPBR next to the standard MPBR, and the group size at MPBR. Hover the chart to see the top and bottom of the group at any distance.
- Switch the chart to Light before you screenshot it for your notes or the back of your stock.
For the basics of point blank range itself, see the point blank range guide.
Frequently asked questions
What is maximum point blank range (MPBR)?
Maximum point blank range is the longest distance over which you can hold dead centre on an animal and still have the bullet land inside a chosen vital zone, without holding over or dialling your scope. It depends on the bullet's trajectory, your sight height, and how big you make the vital zone.
What is practical MPBR?
Practical MPBR is the distance to which your whole group, not just the average bullet path, stays inside the vital zone. Because every rifle and shooter scatter shots a little, practical MPBR is always shorter than the textbook figure once you enter a precision value above zero.
Why does practical MPBR end where the top of the group starts missing?
An MPBR zero is set so the bullet path just touches the top of the vital zone at its highest point. The centre of the group therefore grazes the top edge, so the upper half of any real group sits above the zone around the peak of the trajectory. The first miss is usually high, in the middle distances, not low at long range.
What does the precision (MOA) input mean?
It is the size of the group you can realistically hold from the position you will shoot from, measured in minutes of angle. 1 MOA here means 1 inch of group height for every 100 yards. A 3 MOA seated shooter is expected to spread shots about 9 inches tall at 300 yards.
How do I get more practical point blank range?
Use a zero slightly lower than the pure MPBR zero so the group has room under the top of the vital zone, shoot from a steadier position, or accept a smaller maximum distance. A flatter load helps, but tightening your field group almost always helps more.
A last word
Every one of us owes the animal a clean shot. Knowing your practical point blank range, and not just the textbook one, is part of that. Put your honest group size in, look at where the band turns red, and let that be the distance you trust when there's no time to range.